how to mix artificial and natural light successfully
by J Floor Anthoni (2000-2005) www.seafriends.org.nz/phgraph/mixed.htm
For mixed light photography underwater,
one needs an underwater strobe or flash gun. The strobe brings white, colourful
light to the bluish ambient light, which makes pictures under water more
interesting. The marine environment can be very colourful, particularly
deeper down, and this can be captured only by artificial light. But strobe
light can be too dominant, spoiling the underwater atmosphere. So, mastering
the balance between artificial lighting and natural lighting, is important.
It is called mixed light photography, the subject of this page.
Most strobes are controlled by the camera such that they can no longer
be controlled by the photographer, yet this is one of the most important
skills in underwater photography.
Introduction Before humans could make light of sufficient
intensity and quality for taking pictures, our painters had to suffice
with the richness of ambient light. Claude Monet is my favourite painter.
I admire the way he explored and pictured the quality of the light, without
really understanding its physics. Had Monet been able to view the underwater
world, he would indeed have been astounded (and confused). Monet had to
render his pictures in the colours he mixed on his palet - colours that
would look different when viewed later, under a different quality of light.
For the photographer, this task is much easier, but nonetheless equally
confusing.
The first photographic strobes consisted of magnesium
powder, ignited with much skill. Later, electrically fired flash bulbs
with magnesium wire inside them, were used. These flash bulbs were designed
to burn the magnesium wire completely and consistently and as fast as was
feasible (about 1/250 second). It enabled photographers to bring light
into dark places and to use it creatively. When the first images were produced
with more than one source of light, they must have looked astounding, but
nowadays we are so used to this. We expect television and theatrical shows
to bathe in light from many directions, and that the light be used for
creative effects. No doubt, one day such extravagance will enter the sea,
but for now, the under water environment retains its innocence.
The flash bulbs were replaced with electronic
strobes, producing light of daylight quality and of such intensity that
they would discharge in 1/1000 to 1/10,000 second.
The reasons that strobe lights were used under
water were firstly to capture its otherwise invisible colours. Armed with
bags of flash bulbs, our early under water photographers were able to fascinate
the public with pictures of an incredibly shaped and coloured world, never
witnessed before. At that time, two types of flash bulb were available:
the white bulb and the blue bulb. The blue bulb was corrected to produce
light of daylight quality whereas the white bulb produced lamplight quality.
Some under water photographers used both, preferring the white bulbs for
subjects at distance. Unknowingly, they were experimenting with the colour
corrections necessary for mixed light photography. They also discovered
that flash light can destroy the under water atmosphere.
In this chapter we'll explore how to use ambient
light to the full and how to introduce artificial light in such a way that
it overcomes the disadvantages of ambient under water light while not being
intrusive or introducing new problems.
Claude Monet (1840-1926),
a French painter is considered to have started and led the Impressionist
style of painting. He spent his childhood near the sea, wandering along
the beaches of France's west coast near the harbour city Le Havre, which
befriended him with nature. Starting painting at age 15, initially producing
pencil sketches and carricatures, he was introduced to painting landscapes
in the open air (au plein air). At the time, landscapes were usually painted
in the studio. Being obsessed and often confused by the changing properties
of light, Monet devised innovative methods of rendering his paintings to
look like the real world. He often painted series of exactly the same subject,
seen in different light or weather conditions. Focussing more on what one
sees (the impression) rather than what it ought to look like, Monet often
fragmented his brush strokes in order to render the colour, opacity and
transparency of natural phenomena such as light-filled fog and mist, back-lit
objects and shade. [by painting in dots, Monet and others invented additive
colour mixing, which is unlike that achieved by mixing colours on a palette]
As the 'painter of light' Monet saw the new art of photography rise from
its very beginnings, which must undoubtedly have influenced him.
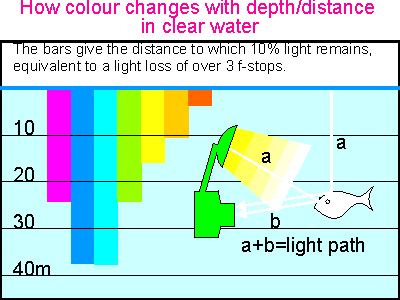
Colour
correction The
problem constantly plaguing the under water photographer, is the quality
of the light changing with distance travelled, as illustrated in this drawing.
First the red colours disappear, then the oranges, yellows and finally
the greens and purples. This colour distortion is very similar to that
caused by clouds and can be corrected with warming filters and colour temperature
correction filters. Note that these have an S-curve, unlike the bell-curve
above, and do not correct the diminishing violet colours! Note also the
difference between the notion of light path and subject distance. For most
strobe-lit photography, the light path is about twice the subject distance.
Here are the most practical filters with their Cokin numbers and Kodak
equivalents:
020: Full tungsten correction, blue (80)
021: Half tungsten correction, light blue
022: Cooling - very light blue (82B or 82C)
027: Slight warming (81B)
028: Warming (81C)
029: Half daylight correction, light orange
030: Full daylight correction, orange (85) as in all Super8 film cameras
047: Full daylight correction and warming; a bit brownish. Avoid this
one.
Note: 020/030 and 021/029 are complementary filters, the one cancelling
out the other, or together producing neutral grey.
Obviously, when correcting for the bluishness of the water, the warming
filters 027 to 047 are used. 027 is too subtle to be of practical use but
028 is always necessary, even in close-up photography at 40-50cm distance.
You will notice the difference! For macros (10-30cm) no correction is needed.
Use 028 for 0.7-1m light path
Use 029 for 1.5-3m light path
Use 030 for 3-5m light path and deeper still. Beyond 10m, these filters
won't work anymore.
Use 047 with care since it makes the colours look rather brownish.
Note that full colour correction is not desired because for some reason
the eye wants to see some of the underwater atmosphere.
Note that Super8 film cameras used film of
type A, colour-balanced for 3400ºK light temperature as emitted by
quarz-halogen photoflood lamps (a standard household lamp is about 2800ºK;
a candle 2000ºK). With their in-built type 85 colour correction filters,
these cameras become balanced for direct sunlight of 5600ºK.
All daylight type films are colour-balanced for light of 5600ºK.
A cloudy sky filters out the warm colours so that it appears to originate
from a light source of up to 7000ºK. With an 81C warming filter its
colours can be balanced. The 81B and 81A warming filters correct progressively
less and are used for less overcast skies. The deep shade under subjects
lit through a bright blue sky is lit by very blue light and needs more
colour correction than an 81C filter can give.
The type 80 blue filter corrects quartz-halogen light of 3400ºK
for daylight type films.
Shallow seaweeds in a sheltered cove at Mayor Island, New Zealand.
This photo, taken at about 2m depth was colour-corrected with a Cokin
030/ Kodak 85 full daylight correction filter. No flash light was used.
The colours in the foreground appear normal, whereas those in the background
progressively fade to blue due to their longer light paths.
This filter can be used down to 2.5m depth for true colour correction
but its effect remains useful down to 5m, requiring very little strobe
fill light.
Lens: 35mm effective (28mm through a flat port)
Shallow seaweeds in Nursery Cove, Poor Knights Islands.
Taken at about 1.5m depth with a Cokin 029 half daylight correction
filter, the seaweeds show their true colours. No flashlight was used.
Note that the light paths for the most important parts of this image
are all about equally long, resulting in correct colours all the way to
the surface.
Lens: 15mm
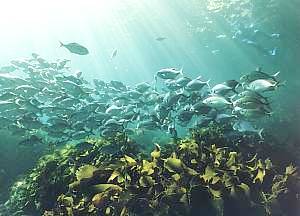
A small school of Blue Maomao above Lessonia seaweeds in Nursery
Cove, Poor Knights, New Zealand.
Taken at about 3.5m depth with a Cokin 030 full daylight correction
filter and no flash light. This is about the limit for full colour correction
with filters alone. Schooling fish are usually very reflective, causing
flash light to be mirrored back, invariably resulting in poor quality images.
But in case the flashlight can becontrolled, a small amount of it would
have made the fish stand out more.
Lens: 15mm
Mixed
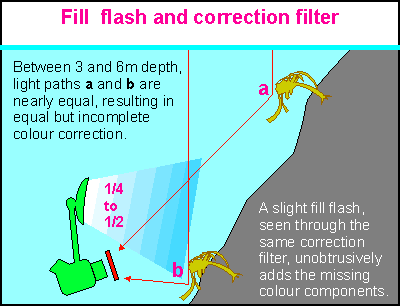
fill with ambient correction filter Beyond
3m depth the daylight colour correction filters are not strong enough to
fully correct all colours, but together with a small amount of flash light,
they can. In fact, a half intensity neutral flash can almost always be
applied between 8m depth and the surface while the (half) correction filter
is in place over the lens. The fill light's most dramatic effect is that
of softening harsh shadows while bringing colour to objects in the foreground.
Because of its low intensity, there is little risk of scatter while the
introduced shadows can hardly be seen. Hold the camera very still!
Refer to the next section for more details.
Note that the colour correction scheme with daylight correction filters
applies particularly to waters that look blue. Those that look greenish
due to light absorption by plant plankton, need correction filters that
are purplish (magenta) in colour rather than orange. However, due to the
fact that visibility also decreases dramatically in these waters, correcting
the colours this way is of little practical value. The Cokin 036 magenta
colour correction filter as is used to correct fluorescent light, is useful
to some extent in green lakes.
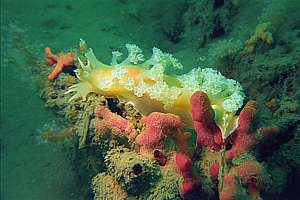
A diver playing with a male demoiselle. While guarding their nests
of eggs, these small fishes muster enormous courage to face up to much
larger animals than themselves. But given time, the fish realises that
no real threat is posed and is prepared to interact in a friendly way.
This photo was taken at 6m depth with a Cokin 030 full daylight correction
filter and a small amount of fill flash (about 1/3). In this manner full
colour correction was achieved while retaining the underwater atmosphere
and its transparency.
Lens: 15mm
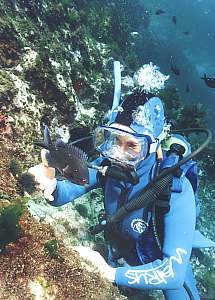
A snorkeldiver has descended to take a closer look at what occurs
behind some rocks.
This photo was taken at 4m depth with a full daylight correction filter
before the lens, in order to correct the ambient light. A half intensity
white strobe light was used to bring shape to the foreground and to light
up the diver's face. All colours appear fully balanced.
Lens: 15mm
Mixed fill light
Although
nearly every under water photographer uses some form of mixed lighting,
the process as such is still poorly understood, resulting in disappointing
images. The term mixed light implies that in some way the image
is exposed by two sources of light, both adding to the film's exposure.
One light source is usually ambient light, creating the underwater atmosphere
and painting the background whereas the second light source is usually
neutrally white strobe light. A mixed light image can thus be composed
of 50% of one light source plus 50% of the other or any other combination
adding up to 100%. For optimal colour rendition one wants more flash than
ambient, which means that if the foreground is properly exposed, the background
turns out too dark. It also leads to colours 'bleaching' towards blue due
to insufficient colour correction. As you can see, this method can theoretically
not produce optimal results, which is confirmed in practice. However, since
the advent of super wide angle 15mm lenses that can be placed very close
to the subject, it became possible to produce pleasing images. However,
subjects that are entirely in the shade, while backlit by a blue sea, can
give correct results.
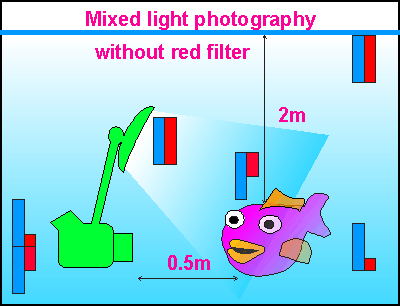
The first drawing (above) illustrates a typical situation. Rather than
showing the entire spectrum from violet to red, only two bars are shown
for blue and red. Ambient light at a certain depth loses the reds and unbalances
the colours (bars in bottom right corner). This is what the camera sees.
By bringing in neutral flash light (equal bars), at even a small distance,
the light becomes unbalanced resulting in more blue than red (bars above
fish). What the film sees is an addition of both as shown in the bars behind
the camera - clearly an unbalanced result, even if no appreciable loss
occurred in the flashed light (use of super wide angle lens).
The
drawing on the right shows the use of coloured light by placing a warming
filter or daylight correction filter over the flash light. It introduces
a reddish fill that combines with the ambient light to produce an almost
perfectly exposed result (the bars behind the camera). This method gives
satisfactory results, even with 100mm lenses for objects up to 1.5m away
(a 3m light path). Note that the background will not be corrected since
the filter is placed over the light rather than the lens, resulting in
colourful objects projected against blue backgrounds. Note also that the
background will always be exposed correctly. Another advantage is that
scatter is reduced because the mainly reddish flash light scatters less
and is less intense. Shadows become nearly invisible.
One of the side effects of this method is that the colour of the fish
fades from true to blue, which can be distracting when it happens to a
model, but often the gradient from true colour to ambient colour is rather
pleasing.
At some stage it is important to decide where to place the correction
filter: before the flash or before the lens? Although this is also a matter
of taste, I suggest: deeper than 10m it should be on the strobe (correcting
for nearby objects) whereas shallower than 5m it should be on the lens
(correcting for distant objects).
The main difficulty in doing mixed light photography is that of controlling
the amount of strobe light, which is discussed later.
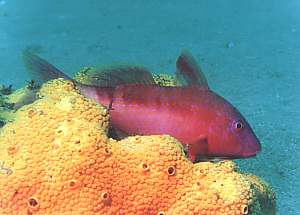
A male goatfish in spawning colours, resting on a yellow boring
sponge. From this strategic location in the current, he masters his small
but temporary territory. Near Leigh, New Zealand.
This photo was taken with warm fill light using a full daylight Cokin
030 colour correction filter at a depth of 21m. Light source at half intensity
and a tripod was used.
Lens: approximately 100mm tele
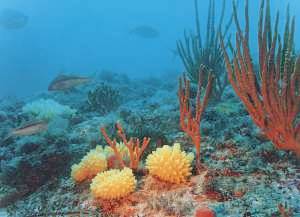
The deep reef habitat starts where sea plants can no longer live
through lack of light. It is inhabited by sessile animals like the orange
finger sponge and yellow nipple sponges.
This photo was taken at 25m depth in the Goat Island marine reserve,
New Zealand. A full daylight correction filter was used before the light
source which was set to a quarter intensity. A tripod was used.
Lens: 50mm effective (standard Nikonos 35mm)
Complementary
filters Complementary filters are those that counter-act each other. When used
together, they have no colour but only a neutral density. The Cokin 020/030
and 021/029 as introduced before, are complementary filters. If their combined
result is simply losing precious light then why use them together?
When a blue filter (020) is placed before the lens and its complementary
orange filter (030) before the strobe, the result will show a sea that
is more blue (and thus attractive?) while the object in the foreground
shows more colour.
Likewise, when an orange filter is placed before the lens to correct
the background colours, then a corresponding blue filter must be used before
the strobe when lighting objects that are close to the lens.
When playing a little with these possibilities, creative effects can
be achieved. Note that filter connot be fitted over a super wide angle
lens, and the only option remaining is one in front of the strobe.
Controlling
the strobe Strobe light outside the photographic studio is a nightmare to use.
The professional units all come with modelling lights so that their combined
result can be judged in the dim light of the studio, before the photo is
taken. They also have 'barn doors' or blinds to achieve spot-lighting,
and a flash intensity meter can be used. But these units are too cumbersome
to use under water.
The main problem is that a strobe fires in such a short time that our
eyes cannot see the result. Another problem is caused by their light dimming
proportional to the inverse square of the distance (as for all lights).
In other words, an object twice as far away, receives only one quarter
of the light intensity. An object at 0.1m receives a hundred times more
light than one at 1m. If you work with variable object distances, the camera
settings are impossible to judge and over- or under-exposure is rife.
If furthermore the strobe's light intensity is to be matched to the
ambient light, one has to master an impossible task. So how can it be done?
Through The Lens (TTL) light metering Modern electronic cameras meter incoming light through the lens and
control the shutter speed or aperture accordingly. These cameras have even
become so smart as to be able to measure the intensity of the strobe light
during its fraction of a millisecond duration and when sufficient, to turn
the strobe off before that millisecond has passed. They are furthermore
able to balance the accumulated strobe light to the ambient light. The
balance can be set between 30% and 200%, giving an acceptable range of
control. A disadvantage of such cameras is that the settings are rather
awkward to change under water.
Modern cameras use the pre-flash method to assess the effect
of the fill flash. Just before the actual exposure, the camera operates
the flash several times with small pre-flashes, measuring their effect
in the light metering quadrants (5 places in the image). Then it calculates
the optimal light quantity and fires the flash accordingly while the shutter
is fully opened. Note that remotely activated strobes may fire at the wrong
time because of pre-flashes, and they too should be designed to follow
the pre-flashing scheme. Please do not confuse exposure pre-flashing
with that for red-eye removal. If you use a digital camera uner water,
turn the red-eye pre-flash off! It just wastes precious time and upsets
the fish.
Self-timing strobes The first reliable way to control a strobe was by its own light metering
circuit which measures the reflected light and stops the strobe when sufficient
light has been emitted. In the earlier models the strobe's power was simply
drained by another, invisible flash bulb inside the housing, thereby turning
the outside one off. It resulted in a full power shot each time, draining
batteries quickly while recycling slowly.
Later the 'thyristor' controlled units were able to turn the strobe
off while retaining all remaining and unused power. These units used considerably
less power and recharged quickly most of the time.
Controlling these strobe lights was simple by placing a neutral density
filter before the optical sensor. Most units provided three to four settings.
If these were not enough, a stepped neutral density filter could easily
be made and placed before the optical sensor, even in the water!
Bringing such a strobe in balance with ambient light is done by choosing
the 'aperture priority' mode of light exposure on the camera and setting
the strobe accordingly. So for a given film speed, the four settings on
the strobe could relate to f-stops: 5.6, 8, 11 and 16. Adding half flash
light to an exposure using f11 on the camera, means choosing the f8 setting
on the strobe.
This method works quite well and is easily adjusted under water, even
when operating at 40m depth in a narked state. It is my preferred method,
although modern cameras like the Nikonos RS do some clever thinking!
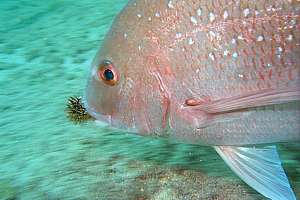
A young snapper (Pagrus auratus)
has found a sea urchin and flees from the attention of other snappers.
This photograph was taken at 5m depth with a full daylight correcting
filter on the strobe which fired at 1/4 intensity, leading to a fully balanced
subject while also showing the blue background. Notice the small amount
of reflection and how the frozen red image gives sharpness to the whole.
Lens: 35mm effective (28mm through a flat port)
The Nikonos5 under water camera The Nikonos5 camera has through the lens light metering, including
its strobe but has no settings to balance strobe with ambient light other
than its factory settings. The problem is mainly that of reducing the strobe
light in a reliable way so that colour correction can be applied. Placing
a neutral density filter before such a TTL strobe won't work because the
camera simply instructs it to produce more light. But there are subtle
ways, once one understands how the camera's electronic logic works.
The Nikonos5 has a shutter that needs to expose for a minimum of 1/90
second or the shutter will be visible on the image. In that short period,
all light integration takes place when the strobe is turned on. With the
strobe turned off, light integration may take much longer, even for several
seconds. So, by its design, all strobe-lit shots are destined to turn up
with dark backgrounds - unless:
A fast film is used, requiring an exposure of say 1/250 second before the
strobe is turned on. The camera now forces 1/90s, thereby overexposing
the background about 2 times. This works quite well and is relatively easy
to control by means of its aperture but it requires sufficient amounts
of ambient light and fast film.
The shutter speed on the camera is set manually to 1/30s. This fools the
logic which still integrates all light in 1/90s, but then keeps the shutter
open for another 2/90s, exposing the background three times. At the 1/60s
setting, the background is exposed 1.5 times. When using negative film,
this variance in exposure falls within film tolerances and no further adjustments
need to be made to the camera, but for slide film one may need to set the
film speed somewhat higher (for less exposure). A difficulty of this method
is that aperture settings have to be checked regularly and that the manual
timing dial needs to be rotated from A to 30 and back many times.
The strobe is exhausted before integration is reached. The camera then
sees less strobe light and makes up the difference by leaving the shutter
open until full integration is achieved. This is easy to do by turning
the aperture setting to higher apertures and bracketing shots accordingly
(first at f8, then f11, then f16). Some strobes show when they have exhausted
their capacity. A disadvantage of this method is that the strobe recycles
slowly while causing maximum battery drainage.
I am using the first and last methods to tame the automatic (but weak)
Nikonos TTL strobe. When using the 15mm lens, this is workable. Note that
strobes are available for the Nikonos5 that do their own light metering
and timing.
The Nikonos RS underwater camera The Nikonos RS camera has a very sophisticated method of balancing
its strobe light. It does so by dividing the image into five areas, producing
micro flashes before opening the shutter, and measuring the strobe intensity
in each area. Most automatically balanced results are pleasing, but manual
control is needed for quite a number of situations, such as for silvery
fishes, shooting with colour filters and so on. The RS has an overriding
dial to over and under expose, but this adjusts both strobe light and shutter
speed in (automatic) aperture mode, resulting in the same balance of light.
But there is a way around.
In manual mode, it cannot use the five segment light metering, and it
resorts to wide spot metering. In the viewfinder, the amount of exposure
is visible as a bar. Also the automatic shutter speed settings can be copied
by manual adjustment. Adjust aperture and speed to expose the background
correctly. The computer cannot change that. Now turn the over/under exposure
dial -1 stop, to underexpose the strobe. This gives reliable and beautifully
lit images. Use filters as required, and stop down to -2 where surreptitious
lighting is needed. The disadvantage is always that dials need to be turned
under water as soon as the light changes. fortunately for the RS, these
are big and easy to operate.
Continuous
movie light Bathing the subject in continuous movie light and being able to judge
the result accurately, feels like bringing a photographic studio under
water, delivering reliable results shot after shot. The continuous light
enables one to see the result and normal light metering can be used. A
100W quartz-halogen beam is sufficient to open a number of exciting possibilities:
Colour correction: because tungsten light is rather orange in colour,
it acts as if a daylight correction filter is permanently in place. With
the various blue filters available, the light can now be balanced for the
distance to the object and the amount of ambient light available. It is
a process judged entirely visually, producing exciting results.
Invisible shadows: because the lamp light is rather weak and is
used primarily to correct ambient light, shadows are hardly visible.
Spot-lighting: by applying light and colour to part of the image
helps focus the eye while retaining the underwater atmosphere. The width
of your movie light needs to be adjusted in the water.
Good results in dirty water: being continuous, long exposure times
can be used to record the static things (the subject) while not recording
the things that move (scatter). A tripod is needed.
Continuous movie light has its disadvantages too:
A large battery needs to be carried. When compactly housed so it
is heavier than water, while mounted on the dive tank, this saves some
weight off your weight belt.
Charging facilities need to be available. Design your system for
12 or 24 Volt standard, which is available in boats and cars.
The light is weak, so it is most suitable for dark temperate waters.
It requires fast film too.
It is less suitable for fast moving subjects. Strobe light freezes
their movements better, and gives more crispness, as also shorter shutter
speeds are used.
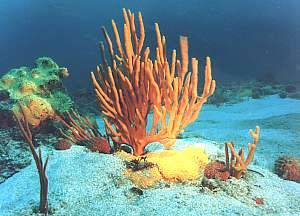
At 25m depth in the currents running around Cape Rodney, beautiful
gardens of sponges are found. In this picture at least four varieties can
be seen.
This photo was taken with two continuous movie lights without filters,
balanced visually. The warm light completes the missing colours, giving
a transparent look that retains the under water atmosphere. Only one shot
was taken. No bracketing was necessary. Note how one branch was waving
in the current.
Lens: 35mm effective (28mm with flat port)
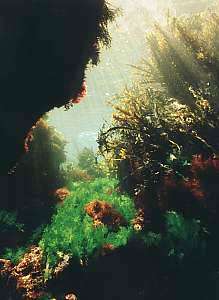
Despite their waters being turbid, many estuaries harbour delicate
life forms which subsist in these conditions. A tritonia seaslug is seen
feasting on its traditional food, a soft alcyonium coral.
This macro photo was taken in extremely dirty water with large floating
particles. By using tungsten light filtered with a full tungsten correction
filter (020) while exposing for about half a second, all dust and scatter
disappeared from the image while at the same time a view was opened to
the deep background. On this photo the water looks much clearer than it
actually was. Depth 10m.
Lens: approximately 100mm
After having cannibalised another octopus which he is holding in
his web, this male sand octopus has found refuge in the confines of a decaying
crayfish pot.
At a depth of 19m, tungsten light with a half tungsten correction filter
(021) were used to highlight the subject of this situation. The vast amount
of sand particles suspended in the water can hardly be noticed.
 The
problem constantly plaguing the under water photographer, is the quality
of the light changing with distance travelled, as illustrated in this drawing.
First the red colours disappear, then the oranges, yellows and finally
the greens and purples. This colour distortion is very similar to that
caused by clouds and can be corrected with warming filters and colour temperature
correction filters. Note that these have an S-curve, unlike the bell-curve
above, and do not correct the diminishing violet colours! Note also the
difference between the notion of light path and subject distance. For most
strobe-lit photography, the light path is about twice the subject distance.
The
problem constantly plaguing the under water photographer, is the quality
of the light changing with distance travelled, as illustrated in this drawing.
First the red colours disappear, then the oranges, yellows and finally
the greens and purples. This colour distortion is very similar to that
caused by clouds and can be corrected with warming filters and colour temperature
correction filters. Note that these have an S-curve, unlike the bell-curve
above, and do not correct the diminishing violet colours! Note also the
difference between the notion of light path and subject distance. For most
strobe-lit photography, the light path is about twice the subject distance.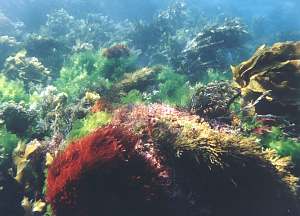
 Beyond
3m depth the daylight colour correction filters are not strong enough to
fully correct all colours, but together with a small amount of flash light,
they can. In fact, a half intensity neutral flash can almost always be
applied between 8m depth and the surface while the (half) correction filter
is in place over the lens. The fill light's most dramatic effect is that
of softening harsh shadows while bringing colour to objects in the foreground.
Because of its low intensity, there is little risk of scatter while the
introduced shadows can hardly be seen. Hold the camera very still!
Beyond
3m depth the daylight colour correction filters are not strong enough to
fully correct all colours, but together with a small amount of flash light,
they can. In fact, a half intensity neutral flash can almost always be
applied between 8m depth and the surface while the (half) correction filter
is in place over the lens. The fill light's most dramatic effect is that
of softening harsh shadows while bringing colour to objects in the foreground.
Because of its low intensity, there is little risk of scatter while the
introduced shadows can hardly be seen. Hold the camera very still!

 Although
nearly every under water photographer uses some form of mixed lighting,
the process as such is still poorly understood, resulting in disappointing
images. The term mixed light implies that in some way the image
is exposed by two sources of light, both adding to the film's exposure.
One light source is usually ambient light, creating the underwater atmosphere
and painting the background whereas the second light source is usually
neutrally white strobe light. A mixed light image can thus be composed
of 50% of one light source plus 50% of the other or any other combination
adding up to 100%. For optimal colour rendition one wants more flash than
ambient, which means that if the foreground is properly exposed, the background
turns out too dark. It also leads to colours 'bleaching' towards blue due
to insufficient colour correction. As you can see, this method can theoretically
not produce optimal results, which is confirmed in practice. However, since
the advent of super wide angle 15mm lenses that can be placed very close
to the subject, it became possible to produce pleasing images. However,
subjects that are entirely in the shade, while backlit by a blue sea, can
give correct results.
Although
nearly every under water photographer uses some form of mixed lighting,
the process as such is still poorly understood, resulting in disappointing
images. The term mixed light implies that in some way the image
is exposed by two sources of light, both adding to the film's exposure.
One light source is usually ambient light, creating the underwater atmosphere
and painting the background whereas the second light source is usually
neutrally white strobe light. A mixed light image can thus be composed
of 50% of one light source plus 50% of the other or any other combination
adding up to 100%. For optimal colour rendition one wants more flash than
ambient, which means that if the foreground is properly exposed, the background
turns out too dark. It also leads to colours 'bleaching' towards blue due
to insufficient colour correction. As you can see, this method can theoretically
not produce optimal results, which is confirmed in practice. However, since
the advent of super wide angle 15mm lenses that can be placed very close
to the subject, it became possible to produce pleasing images. However,
subjects that are entirely in the shade, while backlit by a blue sea, can
give correct results.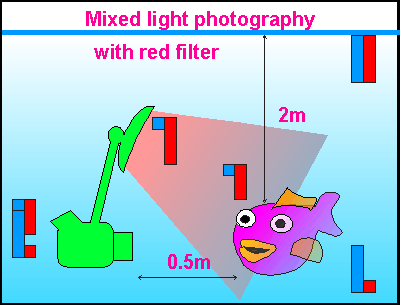 The
drawing on the right shows the use of coloured light by placing a warming
filter or daylight correction filter over the flash light. It introduces
a reddish fill that combines with the ambient light to produce an almost
perfectly exposed result (the bars behind the camera). This method gives
satisfactory results, even with 100mm lenses for objects up to 1.5m away
(a 3m light path). Note that the background will not be corrected since
the filter is placed over the light rather than the lens, resulting in
colourful objects projected against blue backgrounds. Note also that the
background will always be exposed correctly. Another advantage is that
scatter is reduced because the mainly reddish flash light scatters less
and is less intense. Shadows become nearly invisible.
The
drawing on the right shows the use of coloured light by placing a warming
filter or daylight correction filter over the flash light. It introduces
a reddish fill that combines with the ambient light to produce an almost
perfectly exposed result (the bars behind the camera). This method gives
satisfactory results, even with 100mm lenses for objects up to 1.5m away
(a 3m light path). Note that the background will not be corrected since
the filter is placed over the light rather than the lens, resulting in
colourful objects projected against blue backgrounds. Note also that the
background will always be exposed correctly. Another advantage is that
scatter is reduced because the mainly reddish flash light scatters less
and is less intense. Shadows become nearly invisible.